HEXPARKET
LAYING INSTRUCTIONS
1. GENEREL INFORMATION
Junckers Hexparket wood tile is a supplement to single stave parquet which is a traditional type of wooden flooring used for centuries. Different traditions for laying and treatment of the floors have been established by craftsmen in different countries and Junckers has great respect for these traditions.
Therefore, this document is to be seen as Junckers’ guidance on laying and conducting a finishing treatment of the Hexparket wood tiles.

Hexparket can be installed according to 2 different methods. See description under laying instructions, methods A and B.
The wood tiles are delivered untreated and require sanding and surface treatment after installation. Find more information in section 5, Surface treatment.
Wood tile dimension: 20.5 x 370 x 370 x 370 mm.
Wood species and grades: See Product Information for Hexparket B 12.0.
At which locations is Hexparket suitable for installation:
Hexparket is suitable for both residential and commercial use. However, be aware of buildings with an unusually dry indoor climate.
A polygonal wood tile constructed of smaller wood pieces such as Hexparket exposed to very dry conditions may develop larger gaps than normal, just as there is a risk of cracks in the tile itself. Hexparket is therefore not suitable for installation in buildings with a relative humidity below 25 %. Contact us for guidance on using HexParket in your project.
Quality control
The Hexparket have gone through a thorough quality control process at the factory. It is however, important also to check for errors and defects before and during the installation.
Before delivery - RH in the building
Before the materials are delivered, the relative humidity in the building must be within the range expected when in use, eg 35 - 65 %, and the temperature must be approximately 20 °C. If the temperature and relative humidity levels cannot be met, we ask you to contact Junckers before delivery. The wood tiles should be delivered 1 or 2 days before installation is due to begin. The wood tiles must not be unwrapped until immediately before laying as it is important that they are as close to the manufacturing condition as possible.
Environmental conditions
In order to keep moisture related movement of the floor to a minimum, the humidity should be stable for extended periods of time and the humidity range, i.e. the difference between the lowest and the highest relative humidity during the year, should not exceed 25 to 30 percentage points. Examples of humidity ranges are: 25 - 50 %, 35 - 65 % RH. The instructions below are based on the range 35 - 65 % RH. If site conditions should vary from the above, it is advisable to contact Junckers Technical Service Department.
Before laying the floor
The building must be weathertight. The heating system must be installed and tested and should be in operation during the heating season. Cast concrete elements, screeding and other wet trades which can contribute moisture to the building, eg tiling, plastering and priming of paintwork, must also be completed.
Underfloor heating
The Hexparket wood tile can be used in connection with underfloor heating systems which will provide an even temperature distribution. The temperature on the surface of the wood tile should not exceed 27 °C. The underfloor heating must be switched off for 2 days before installation is started. After installation it is raised slowly by maximum 5 ºC every second day. However, the working temperature for the adhesive must be minimum 15 °C. With underfloor heating the gaps which typically appear in a wooden floor during the heating season will be larger than with heating from radiators.
2. INSTALLATION
The wood tiles can be
- Screwed, nailed or glued to a subfloor of plywood / existing wooden floor.
- Screwed or glued to a chipboard base.
- Glued down to a concrete or screeded subfloor.
The moisture content of a wood based subfloor must not exceed 12 % and for concrete/screeded subfloors it must not exceed 75 % RH.
When screwing a 500 g/m² floor cardboard is to be inserted between the wooden subfloor and the wood tiles in order to minimize creaking between the tiles and the subfloor. Each tile is fixed by secret screwing or nailing at a 45º angle with 1 screw/nail on each side.
Fixing:
- A 180 mm loose tongue is inserted in the tile groove.
- Loose tounges are delivered along with the tiles.
- For screwing use 45 mm. Monta-Flex screws.
- For nailing use Junckers J-nail or 65 mm T-nail for nail gun.
- For gluing use Junckers Parquet Glue.
- For screw fixing it may be necessary to pre-drill.
- Use a drill with a slightly smaller diameter than the screw.
Existing wooden floor
In order to achieve the correct surface tolerance, the subfloor can be levelled by planning, filling or by fixing minimum 15 mm thick plywood to the base. If plywood is used, the original laying direction can be used. It is important that the existing wooden floor has been properly fixed without loose boards or protruding fastenings.
Plywood floor
Plywood subfloors must be a minimum 18 mm thickness with battens at maximum 520 mm centres. If plywood is being fixed to an existing timber base, 12 mm thickness may be used. Tongue and grooved jointed plywood must be glued together in accordance with the manufacturer’s instructions.
Chipboard floor
Flooring grade chipboard 22 mm can be used and laid on battens with maximum support centres of 600 mm. If the chipboard is laid on an existing floor, it must be approved chipboard of minimum 16 mm. The boards must be fitted according to the manufacturer’s directions and must be glued in the tongue and groove joints.
Concrete/screed
When gluing, it is not possible to use a conventional damp-proof membrane. It is therefore very important to ensure that the surface of the subfloor is smooth, clean and dry. The residual moisture in the subfloor must thus not exceed 65 % RH, which must be checked by measuring.
For more information see technical data sheet C 1.3 General information gluing down floors, section "Measurements of moisture in subfloors".
In case the floor installation needs to be conducted, with a moisture content between 65-95 % RH in the concrete subfloor, or in case of underfloor heating, apply Junckers Liquid Moisture Barrier before gluing. For more information see technical data sheet "Liquid Moisture Barrier" H 6.5.
Different types of subfloors in same floor area:
If several types of subfloors make up the same floor area, the subfloor must be of uniform elasticity and flatness to ensure that the final flooring is of a consistent nature.
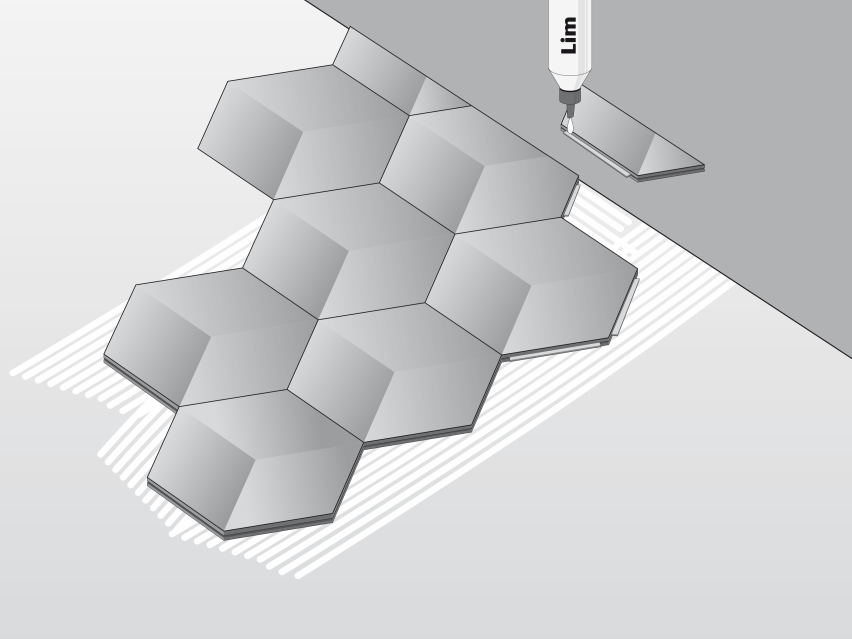
Glue Down method
- For gluing the floor use Junckers Parquet Glue.
- The glue is applied using the Junckers notched Glue Spatula leaving a thin glue coat on the floor between the glue tracks.
- Hold the spatula at an angle of 45° and with the side marked ”2” turned downwards.
- Use approximately 0.5 litre per m², depending on the absorption capacity, structure and flatness of the subfloor.
- Only apply sufficient glue that the laying of the tiles can be finished within 20 minutes.
Hexparket wood tiles must NOT be glued in tongue and groove. However, wood tiles which can´t be securely fastened may occasionally be glued in the heading joints at walls and in the tongue and groove at the last row of wood tiles at the wall.
The first row of tiles is used to set out the rest of the floor and can be fitted with our normal adhesive but it must be thoroughly set before the main field of the floor is installed.
Flatness of the subfloor
The subfloor must be levelled so that any deviations in the flatness do not conflict with the requirements of the method stated below.
Straight edge:
The subfloor must be flat with a maximum deviation of 2 mm under a 1.5 m straight edge.
(UK: 3 mm under a 2 m straight edge).
(US: 10 ft. under a 3/16” straight edge).
Deviations are measured as gaps under the straight edge. The surface must be smooth. Any irregularities must be corrected by grinding or by using a self levelling compound.

Distance to walls and expansion gaps:
Depending on the size of the room, an expansion gap of 12 - 15 mm at walls and fixed installations should be left in order to allow the natural movement of the floor to take place. Junckers can supply matching skirting, quadrant or scotia mouldings to cover this gap. Alternatively the gap can be filled with Junckers rubber strip.
We recommend that expansion gaps are established in the following cases:
- Where there are large variations in temperature and humidity.
- With particularly large floor areas.
- Where the floor is naturally divided by doors etc.
Any structural movement joints in the sub floor of the building must be taken up through the wooden floor if this is glued down to the subfloor.
3. LAYING INSTRUCTION
METHOD - A
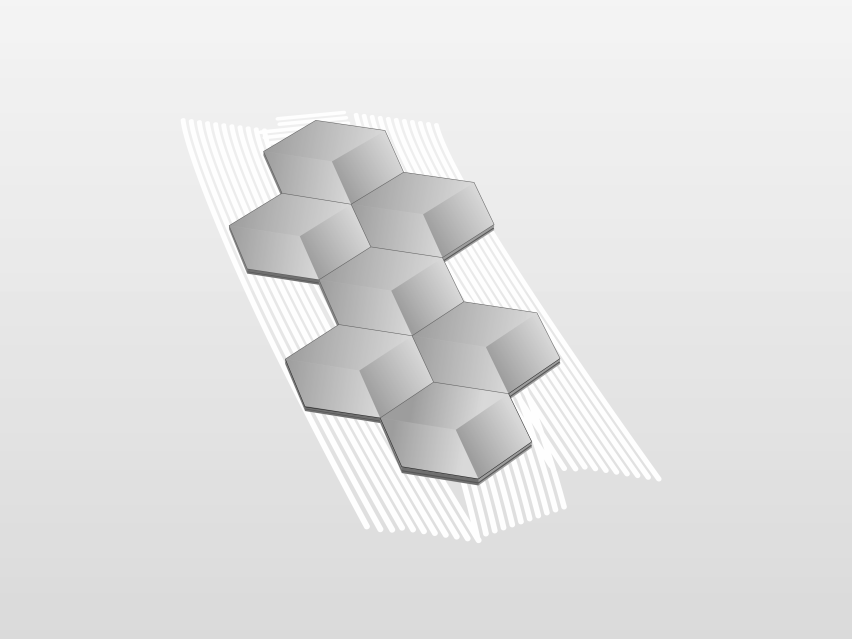
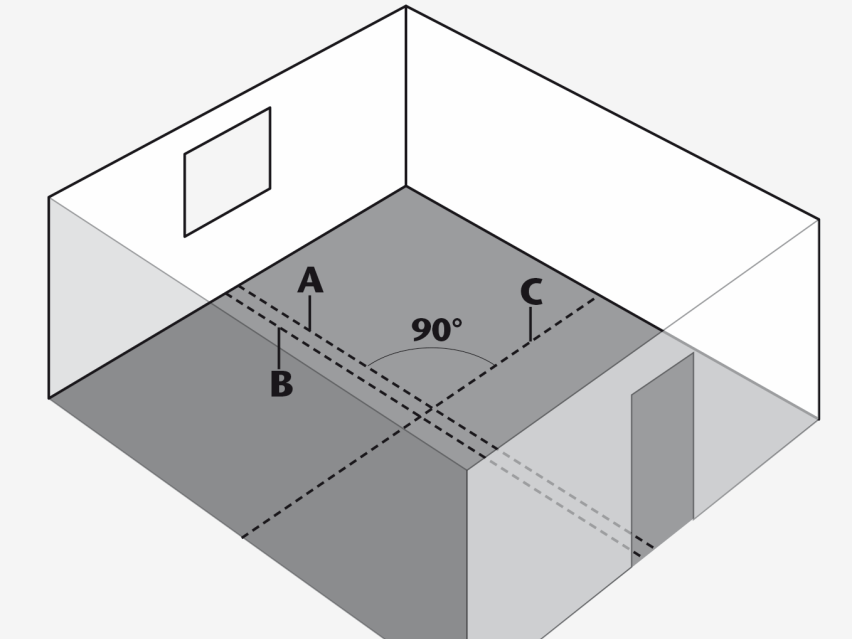
Method - A1
Measure the width and lenght of the room in order to plan the cut row along all sides of the room.
Consider the laying direction of the tiles, see drawing above method A and drawing at method B.
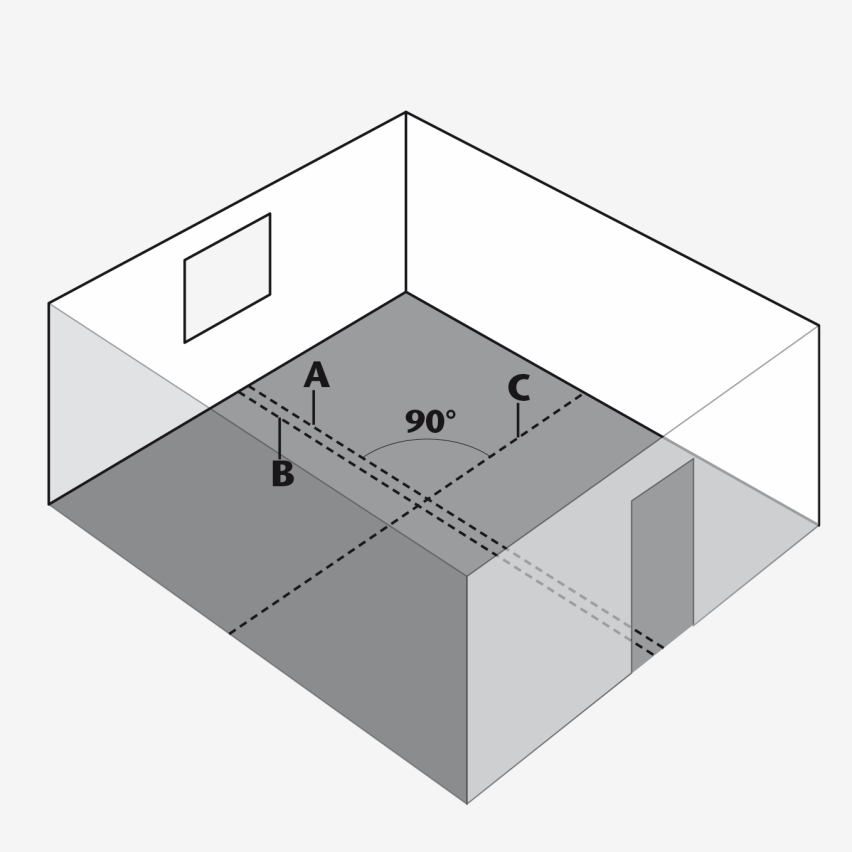
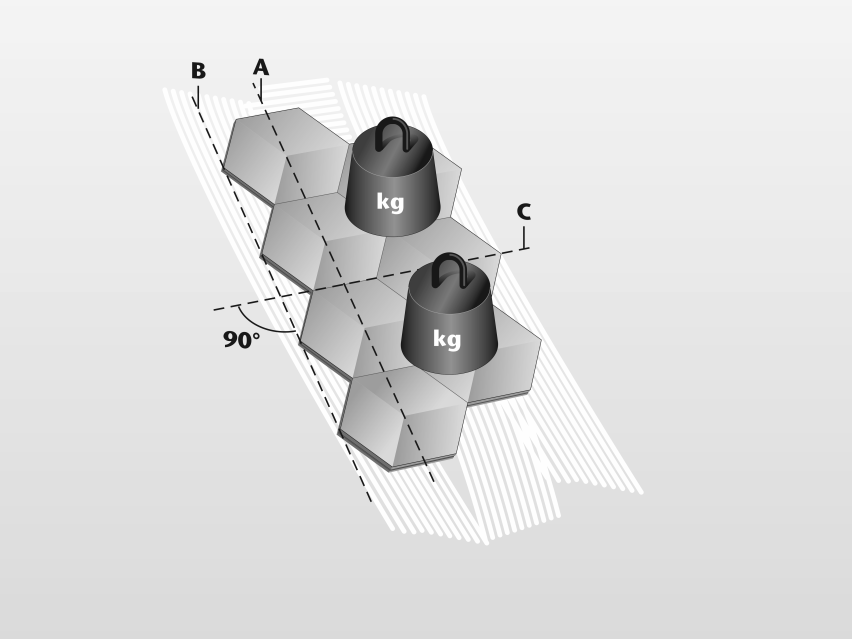
The two centre lines in the room (lines A and C) are marked by a chalk line or string at an angle of 90° to each other.
In order to maintain the laying direction of the starting row a working line B is drawn with a string or a chalk line 185 mm from line A.
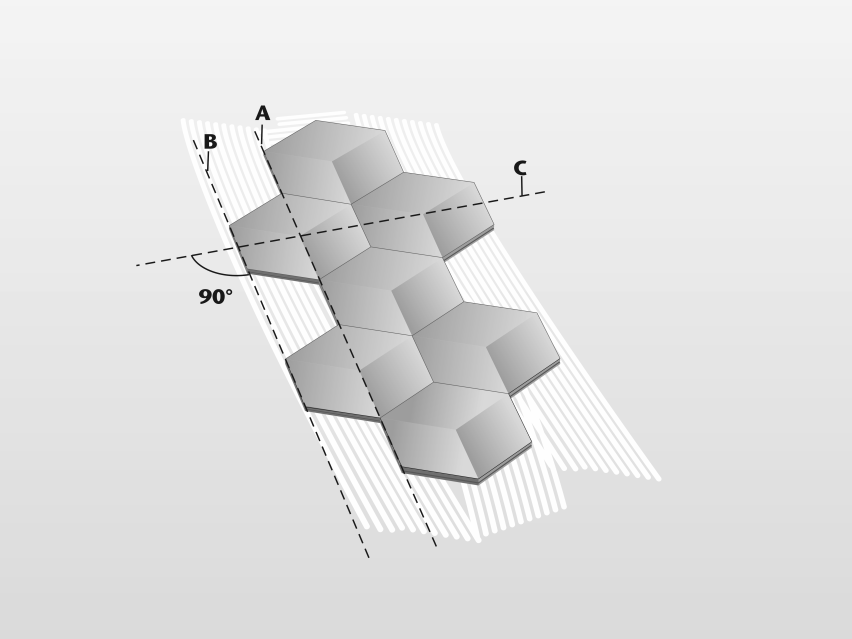
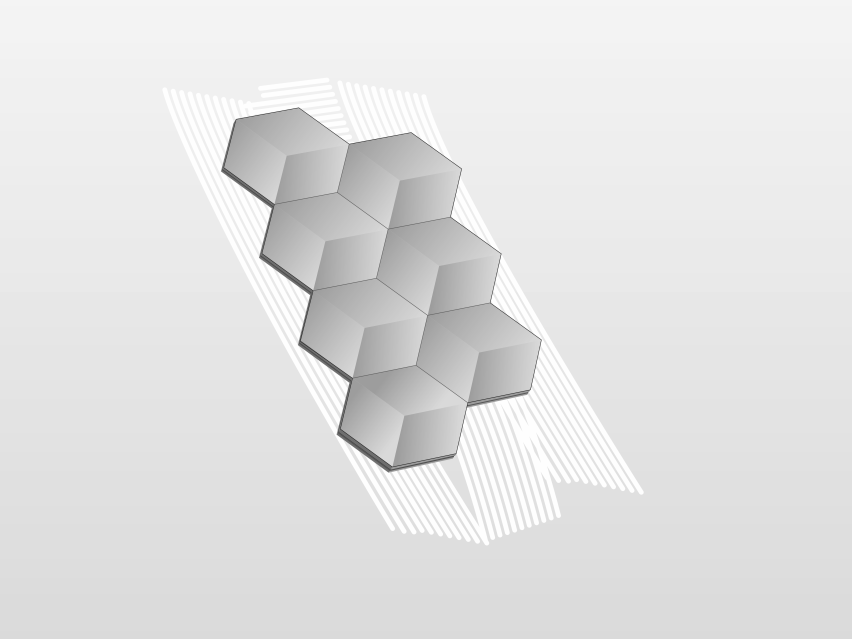
Method A2
To be able to regulate the laying direction of the starting rows, the edges of the tiles must be in line with the working line B.
It can be helpful to draw an extra working line 740 mm to the right from working line B.
If tiles are nailed/screwed you can continue laying of the tiles when starting row is completed as shown.
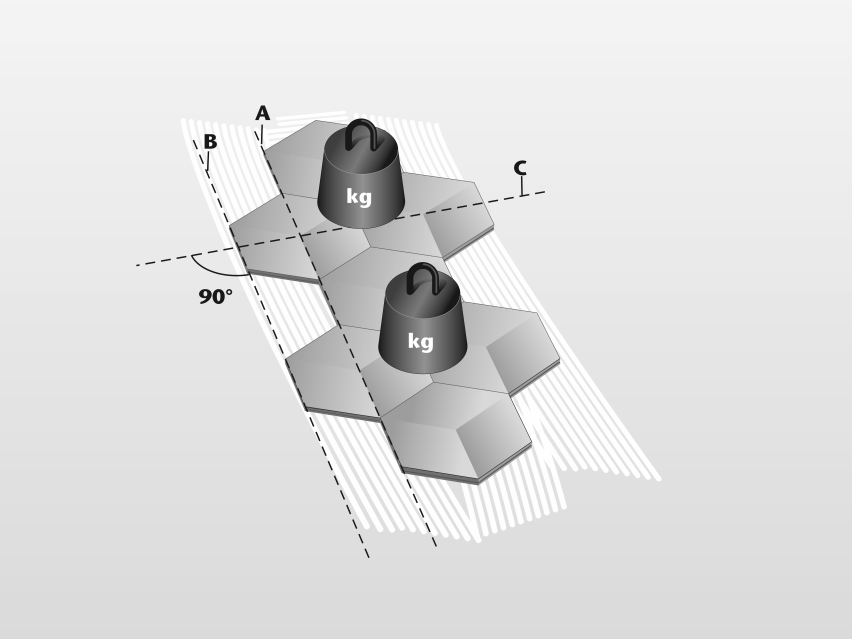
Method A3
When the starting row has been laid it is recommended to leave the adhesive to dry overnight, before the floor laying continues. Do not forget to remove excess glue from the floor.
It is advisable to load the floor continuously during laying to ensure a good bond between staves and sub floor packs of flooring or adhesive containers, can be used for this purpose.
When the starting row is dry, you can continue laying the tiles. Only apply sufficient glue that the laying of the tiles can be finished within 20 minutes.
Metode A4
If the tiles are cut at the border or wall so that they are smaller than the size of a ½ tile the tongue and groove joints of the tiles must be exceptionally well glued.
4. LAYING INSTRUCTION
METHOD - B
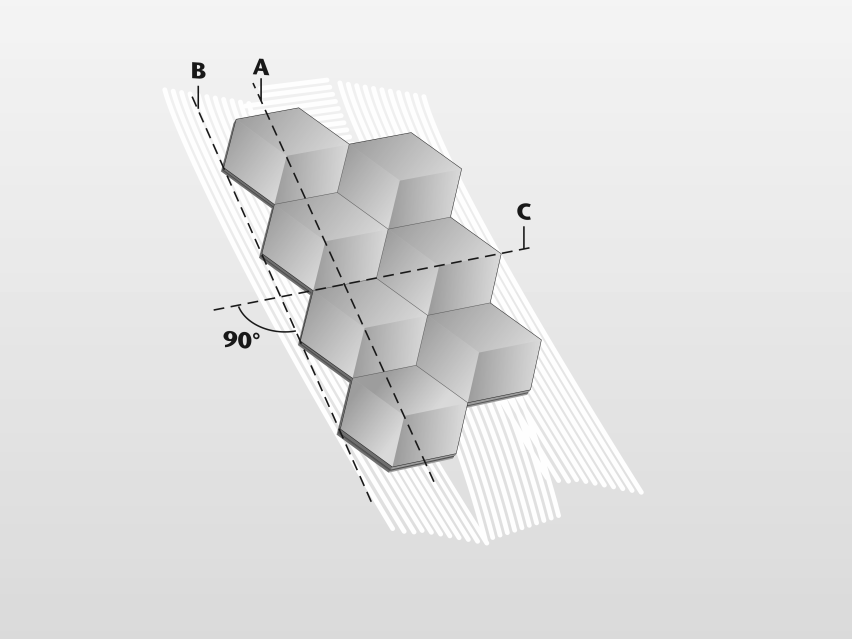
Method B1
Measure the width and lenght of the room in order to plan the cut row along all sides of the room.
Consider the laying direction of the tiles, see drawing above method B and drawing at method A.
The two centre lines in the room (lines A and C) are marked by a chalk line or string at an angle of 90° to each other.
In order to regulate the laying direction of the starting row a working line B is drawn with a string or a chalk line 214 mm from line A.
Method B2
To be able to regulate the laying direction of the starting rows, the edges of the tiles must be in line with the working line B.
It can be helpful to draw an extra working line 748 mm to the right from working line B.
If tiles are nailed/screwed you can continue laying of the tiles when starting row is completed as shown.
Method B3
When the starting row has been laid it is recommended to leave the glue to dry overnight, before the floor laying continues. Do not forget to remove excess glue from the floor. It is advisable to load the floor continuously during laying to ensure a good bond between staves and sub floor packs of flooring or adhesive containers, can be used for this purpose.
When the starting row is dry, you can continue laying the tiles. Only apply sufficient glue that the laying of the tiles can be finished within 20 minutes.
Metode B4
If the tiles are cut at the border or wall so that they are smaller than the size of a ½ tile the tongue and groove joints of the tiles must be exceptionally well glued.

5. SURFACE TREATMENT OF HEXPARKET
A beautiful floor requires a strong and durable surface treatment. There are four alternative methods of surface treatment for a floor laid as Hexparket.
- Lacquer finish
- Oil finish
- Oiling + subsequent lacquering
- Oiling with Hardwax oil
The choice of surface treatment depends on the desired properties and appearance of the finished floor.
Sanding and filling
Before the surface treatment is started, the floor is sanded and filled to achieve an even and smooth surface.
If the staves are glued down, sanding must be carried out no earlier than 24 hours after gluing.
Use Junckers WB Filler to fill the floor.
How to sand the floor
- Floors laid in a pattern are first sanded diagonally and then longitudinally in relation to the grain.
- The entire surface is sanded in the direction from which the light comes.
- Finishing sanding must be done with 120 – 150 grit paper or a rorary finishing sander with 120 grit sandpaper.
- After sanding, the floor is vacuumed thoroughly to remove dirt and dust, etc.
On our website, in the "Wood Care" menu, you will find information about lacquer and oil products that can be used for surface treatment.